
Dear Gene: Our house has beat-up hardwood floors
covered by wall-to-wall carpet. The floors squeak badly. Is there any way
to fix this problem from the basement, without removing the carpeting?
— M.S.
Squeaking floors can be very tricky to repair, but if
you can work from underneath the floor, you have an advantage. The squeaks,
of course, are caused by boards rubbing against each other, or rubbing
against nails, because they are not securely fastened.
A repair method that sometimes works is to check the
underside of the floor for gaps between the subfloor and floor joists. The
gaps must be closed to prevent movement. To stabilize the floor, use thin
wood shims, which can be bought in packs at many home centers. Have someone
walk on the floor while you check underneath for places that squeak. When
you pinpoint a squeak and find a gap, spread some glue on both sides of a
shim and tap it firmly into the gap. Use plenty of shims to completely
close gaps.
Special screw-on brackets are also available for use
from underneath on squeaky floors. One leg of the right-angle bracket is
screwed to the joist; the other is screwed into the floor to pull loose
flooring together. Four of these brackets, with screws, are available from
Improvements for about $15 (www.improvementscatalog.com, item 105064).
It is also possible to stop some squeaks from above,
right through carpeting. This requires special screws that break off when
properly inserted so the heads are not visible, plus a special installation
tool. A kit with 50 screws, the tool, and instructions is available for
about $30 from Improvements (item 110189).
Dear Gene: Several of our double-pane thermal windows
have developed a translucent haze between the panes. These are good-quality
windows, about 20 years old. The manufacturer just said, “This
sometimes happens,” and we had to pay a stiff price to get the glass
replaced. What causes this, and is there a way to prevent it? — C.P.
Fogging inside thermal windows generally means that
the seal between the panes of glass is leaking and admitting moisture,
dirt, and air to the cavity. This is fairly common with older windows, but
seals have been improved in recent years, and many newer windows have
lifetime warranties against leaking seals. If a seal leaks on a warranted
window, you should be able to get replacement glass free but will either
have to install it yourself or pay someone to do it because the warranties
seldom cover labor.
Unfortunately, I know of no way to prevent seals from
leaking or any way to repair them except to replace the glass. Buyers of
new thermal windows should choose a well-established brand, preferably with
a lifetime warranty on seals, and obtain and save a written copy of the
warranty.
Dear Gene: Our wood-frame house was built in 1938
with no insulation in the exterior walls and about 3 inches of blown-in
insulation in the attic crawl space. I am concerned that if I have
insulation blown into the walls I will have moisture damage because the
walls have no vapor barrier. What is your advice about blowing insulation
into the walls? — B.W.
I think your first concern should be the attic, which
has far less insulation than is recommended for any climate area of the
nation. Your current attic insulation probably has an R-value of about 10,
less than one-third of the R value recommended for ceilings even in Florida
or California. Although it isn’t always possible to meet recommended
levels of insulation in an existing house, you should try to double or
triple the amount of insulation you now have.
If you also want to have insulation blown into the
walls, the usual way to provide a vapor barrier is to coat the interior
walls with a moisture-blocking paint or wall covering. One method is to
apply a coat of shellac-based primer-sealer such as Zinsser’s B-I-N
(www.zinsser.com), then finish with either an alkyd or acrylic paint. Vinyl
wall coverings are sometimes also used as vapor barriers.
Gene Austin says he became a do-it-yourselfer by
necessity some 40 years ago when he bought his first house, a fixer-upper
that needed a lot of work. Over the last 20 years, he has helped thousands
of other weekend warriors through his home-improvement column.
Send questions and comments to Gene Austin at
[email protected] or 1730 Blue Bell Pike, Blue Bell, PA 19422. Distributed by Knight-Ridder Newspapers.
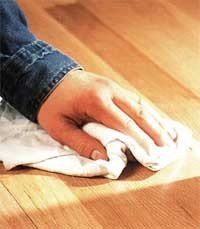
Fixing squeaky floors
If you can get underneath, you have an advantage
[

            {
              "name": "Air - MedRect Combo - Inline Content 1",
              "component": "11490391",
              "insertPoint": "3",
              "requiredCountToDisplay": "1",
              "parentWrapperClass": "fdn-ads-inline-content-block"
            },{
              "name": "Air - MedRect Combo - Inline Content 2",
              "component": "11490392",
              "insertPoint": "7",
              "requiredCountToDisplay": "5",
              "parentWrapperClass": "fdn-ads-inline-content-block"
            },{
              "name": "Air - MedRect Combo - Inline Content 3",
              "component": "11490393",
              "insertPoint": "12",
              "requiredCountToDisplay": "9",
              "parentWrapperClass": "fdn-ads-inline-content-block"
            }

        ]

Illinois Times has provided readers with independent journalism for almost 50 years, from news and politics to arts and culture.
Your support will help cover the costs of editorial content published each week. Without local news organizations, we would be less informed about the issues that affect our community..
Got something to say?
Send a letter to the editor and we'll publish your feedback in print!


© 2024 Illinois Times
